
7 Easy Steps For Proper Log Lighter Maintenance
 Just like all of your other outdoor products, the gas log lighter in your wood-burning fire pit needs routine maintenance as well. Over the course of a summer (or perhaps a few seasons) of enjoying bonfires in your backyard, ash and debris can clog the exhaust portholes of this device. Fireplace Doors Online has some easy DIY instructions on how to ensure your log starter is clean and in good working order!
These instructions are simple and easy to follow. However, if this is your first time cleaning your log lighter, or if you are unfamiliar with the gas supply lines and components in your home, we highly recommend hiring a certified gas technician or a fireplace service professional to help you with this task. After you see how it is done, completing this care on your own should be less intimidating the next time, and it will save you the expense of having to hire someone to complete this task for you.
Words of caution:
- If you ever notice that flames are escaping from the connection where the diffuser meets the incoming supply line, turn the gas off immediately and call your local gas service technician!
- Put out any open flames from a gas leak with a fire extinguisher.
- Please do not smoke when operating or cleaning your gas log lighter!
Gather the following tools for the routine care of your gas log lighter:
- locking vise grips
- adjustable wrench
- flashlight
- coarse steel wool
- wire brushes (assorted sizes)
- 1/8-inch drill bit or large paperclip
- ash or shop vac
- yellow Teflon tapes for gas lines
We recommend performing this procedure before the first/after the last fire of the year, and of course as needed. This procedure tends to be a bit messy. You'll want to make sure that you are conducting this routine maintenance outside or in a garage.
7 Easy Steps - Proper Maintenance for Gas Log Lighters
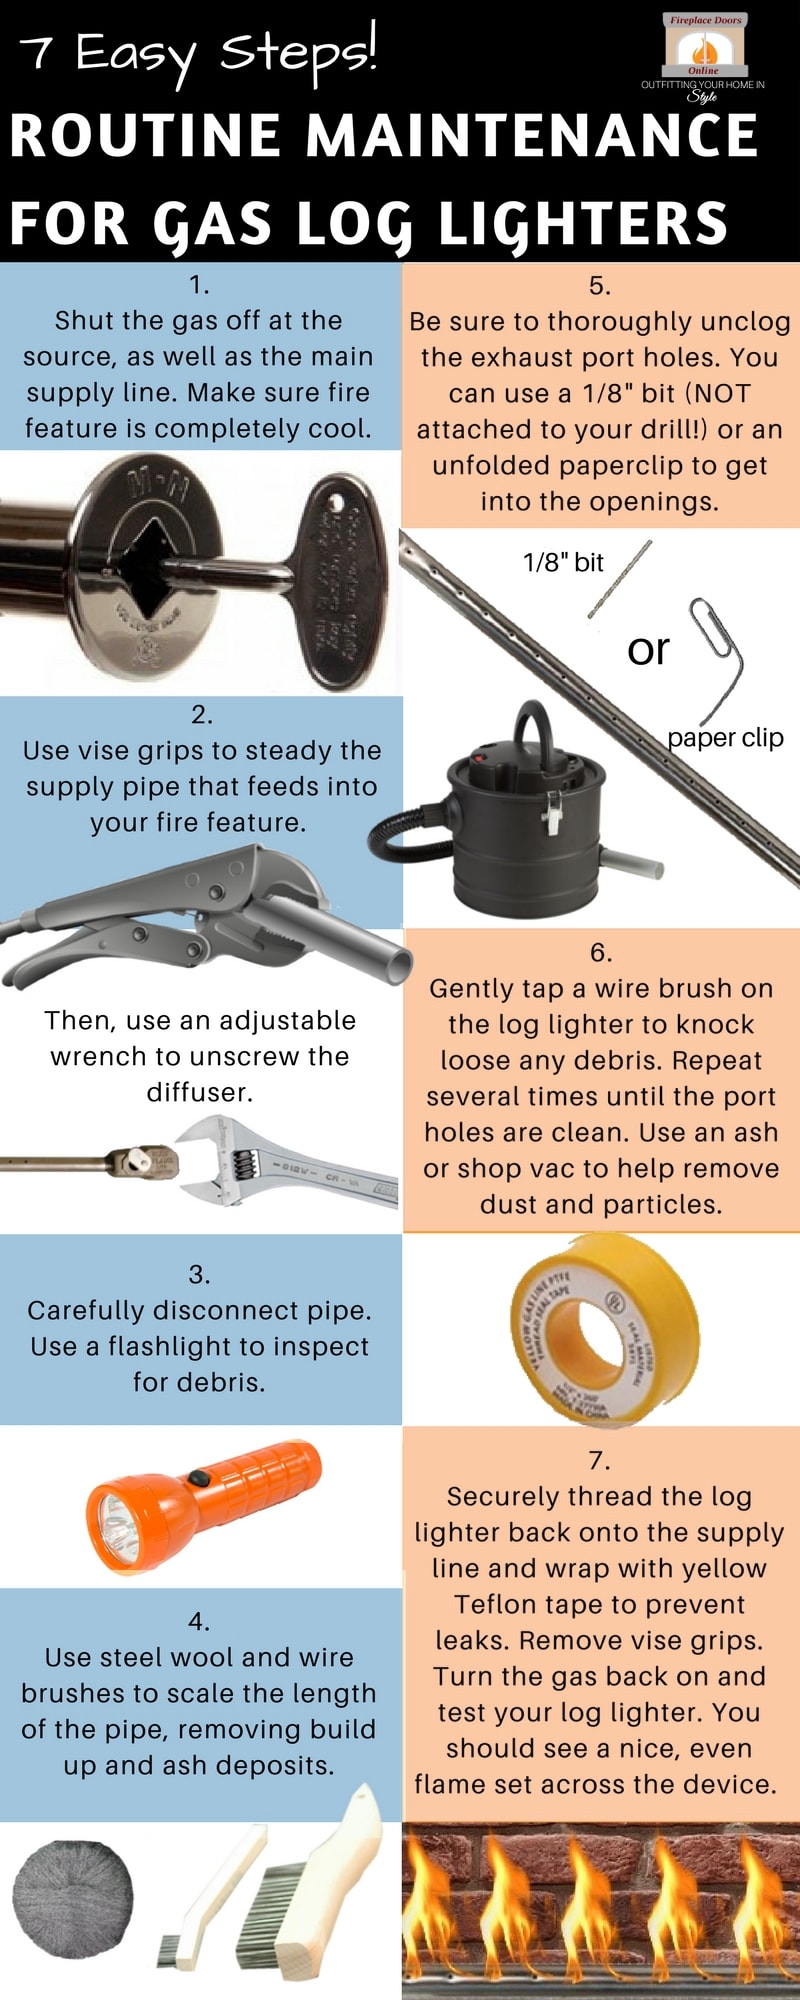
- Make sure the gas is shut off and that your fire pit (or wood-burning fireplace) is completely cool. This includes closing the valve at the source, as well as the main gas delivery line. Cutting off the fuel supply at both locations ensures your safety.
- Use your locking vise grips to grab the supply line that feeds into your wood-burning fire pit. This will keep the pipe steady while you are disconnecting the log lighter. Next, use your adjustable wrench to carefully unscrew the diffuser from the supply line. Never tug or try to pull the log starter off.
- Once you have the lighter disconnected, use a flashlight to inspect the inside for debris. Observe the exterior of the device as well. Are you able to see light through all of the portholes? If not, this most likely indicates a clog.
- Use the coarse steel wool to scale the entire length of the pipe. Then use your wire brushes to continue scoring away deposits and buildup. Gently tap the log lighter with the handle of the wire brush to remove any dust.
- Be sure to thoroughly unclog the exhaust portholes. Using a 1/8-inch drill (auger) bit or an unfolded paperclip, gently access the opening and push out anything that is blocking the holes. Tap the log lighter again to remove trapped particles. (PLEASE NOTE: the auger bit should be operated by hand - do not place it in a drill and attempt to clean the log lighter mechanically! This will cause permanent damage to the device and void the warranty.)
- Once your log starter is clean and free of debris, use an ash or shop vac to remove any remaining dirt or dust.
- Replace the log lighter. Securely thread it back onto the supply line. As an additional safeguard against potential leaks, be sure to wrap the connection with yellow Teflon tape. Remove the vise grips and turn the gas back on at the main and local sources. A properly operating log lighter will display an even flame set across the device.
If you are still experiencing an issue, it would be in your best interest to shut off the gas completely and contact a certified gas professional immediately to help you further.
Along with proper maintenance for your log lighter, we also recommend checking the device and its connections periodically for leaks, especially if you are not using yellow Teflon tape to secure the attachment. This should also be done if you smell gas when the log starter is not in use. You can easily check the unit with a simple soap solution, believe it or not! All you need is some detergent and a spray bottle.
Check this out:
- Combine 1 part liquid soap and 1 part water in a spray bottle.
- Light a long-stemmed lighter or match under the center of the log starter next to the burner ports.
- Gradually turn the gas on with your valve key until burner ignition occurs.
- Gently spray your soap solution around the supply line and log lighter connection. If a leak is present, soap bubbles will appear. In this case, immediately turn off the gas, tighten the connection, and recheck. If you are still observing a problem, shut the gas off completely and contact a gas technician.
We hope that you've learned how a few simple steps can improve the performance and operating condition of your gas log lighter. Keeping our customers well-informed and safe is a priority of ours! Please take a moment and check out some log lighter products here at Fireplace Doors Online.
No posts found


